Not Dinner: from Concept to 3D (No Forks Necessary)
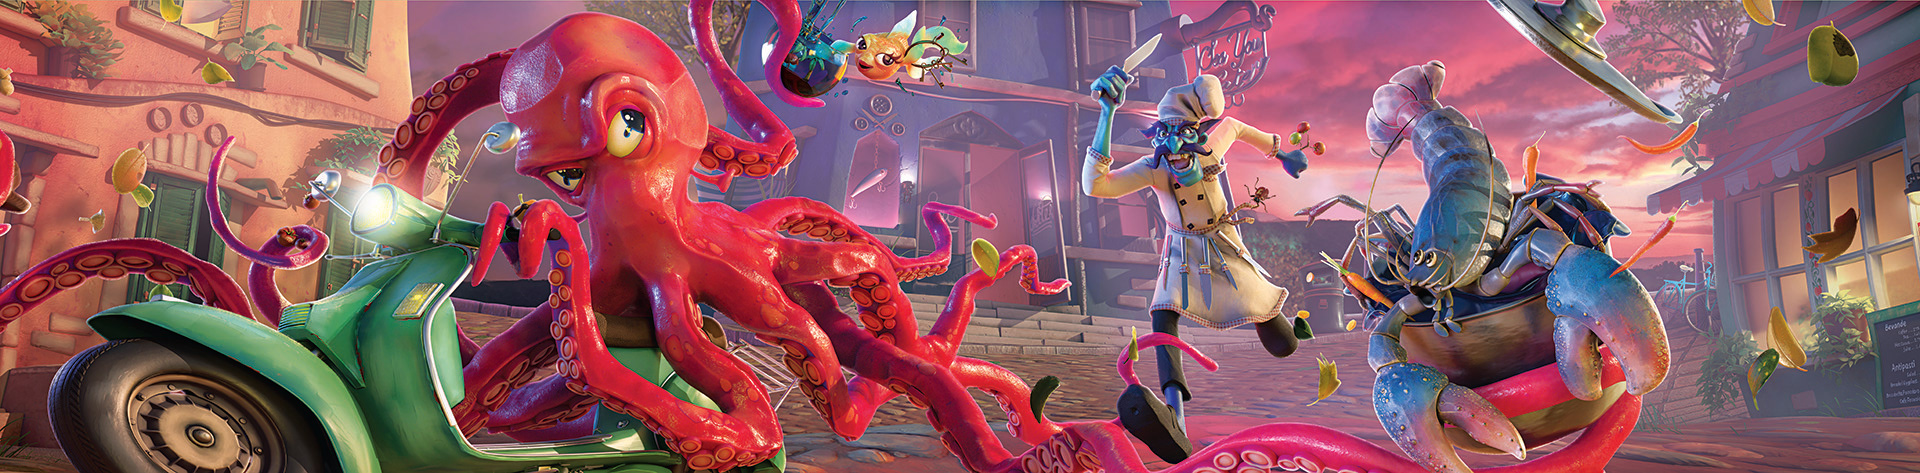
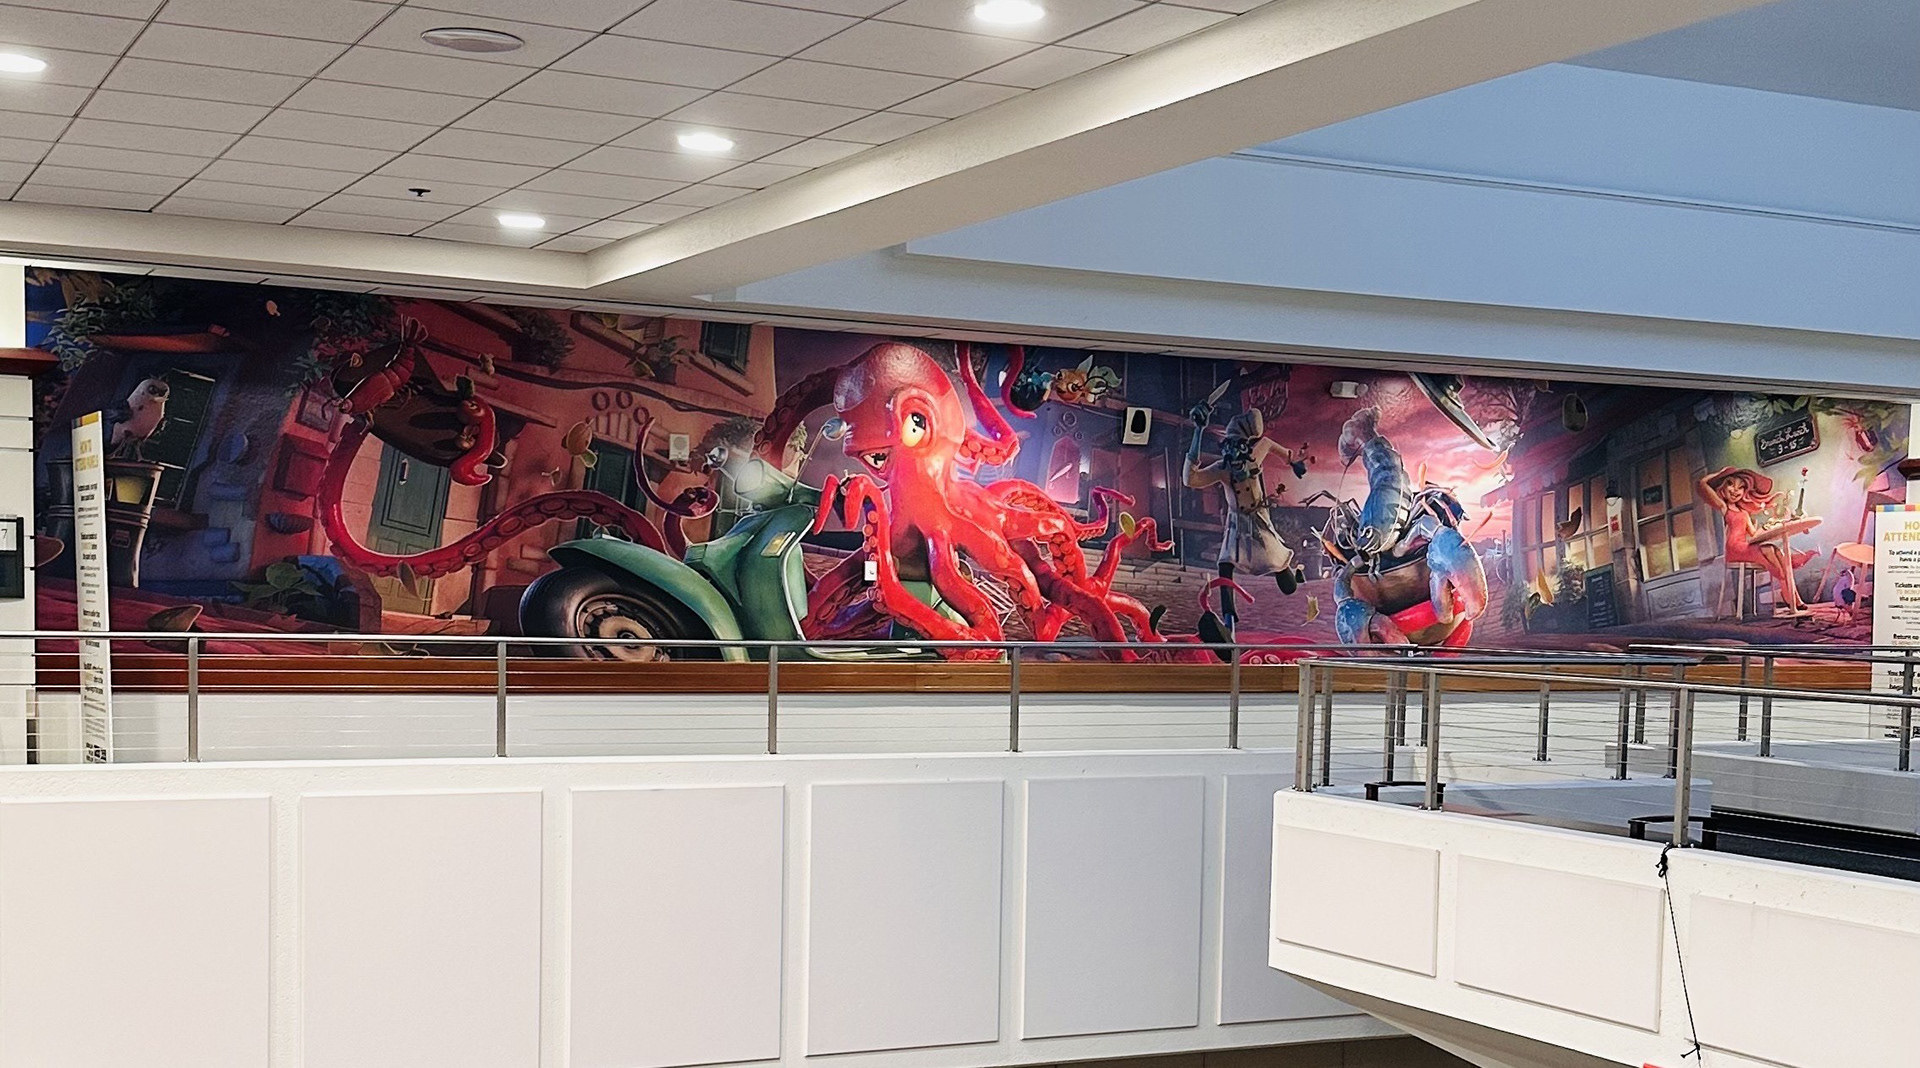
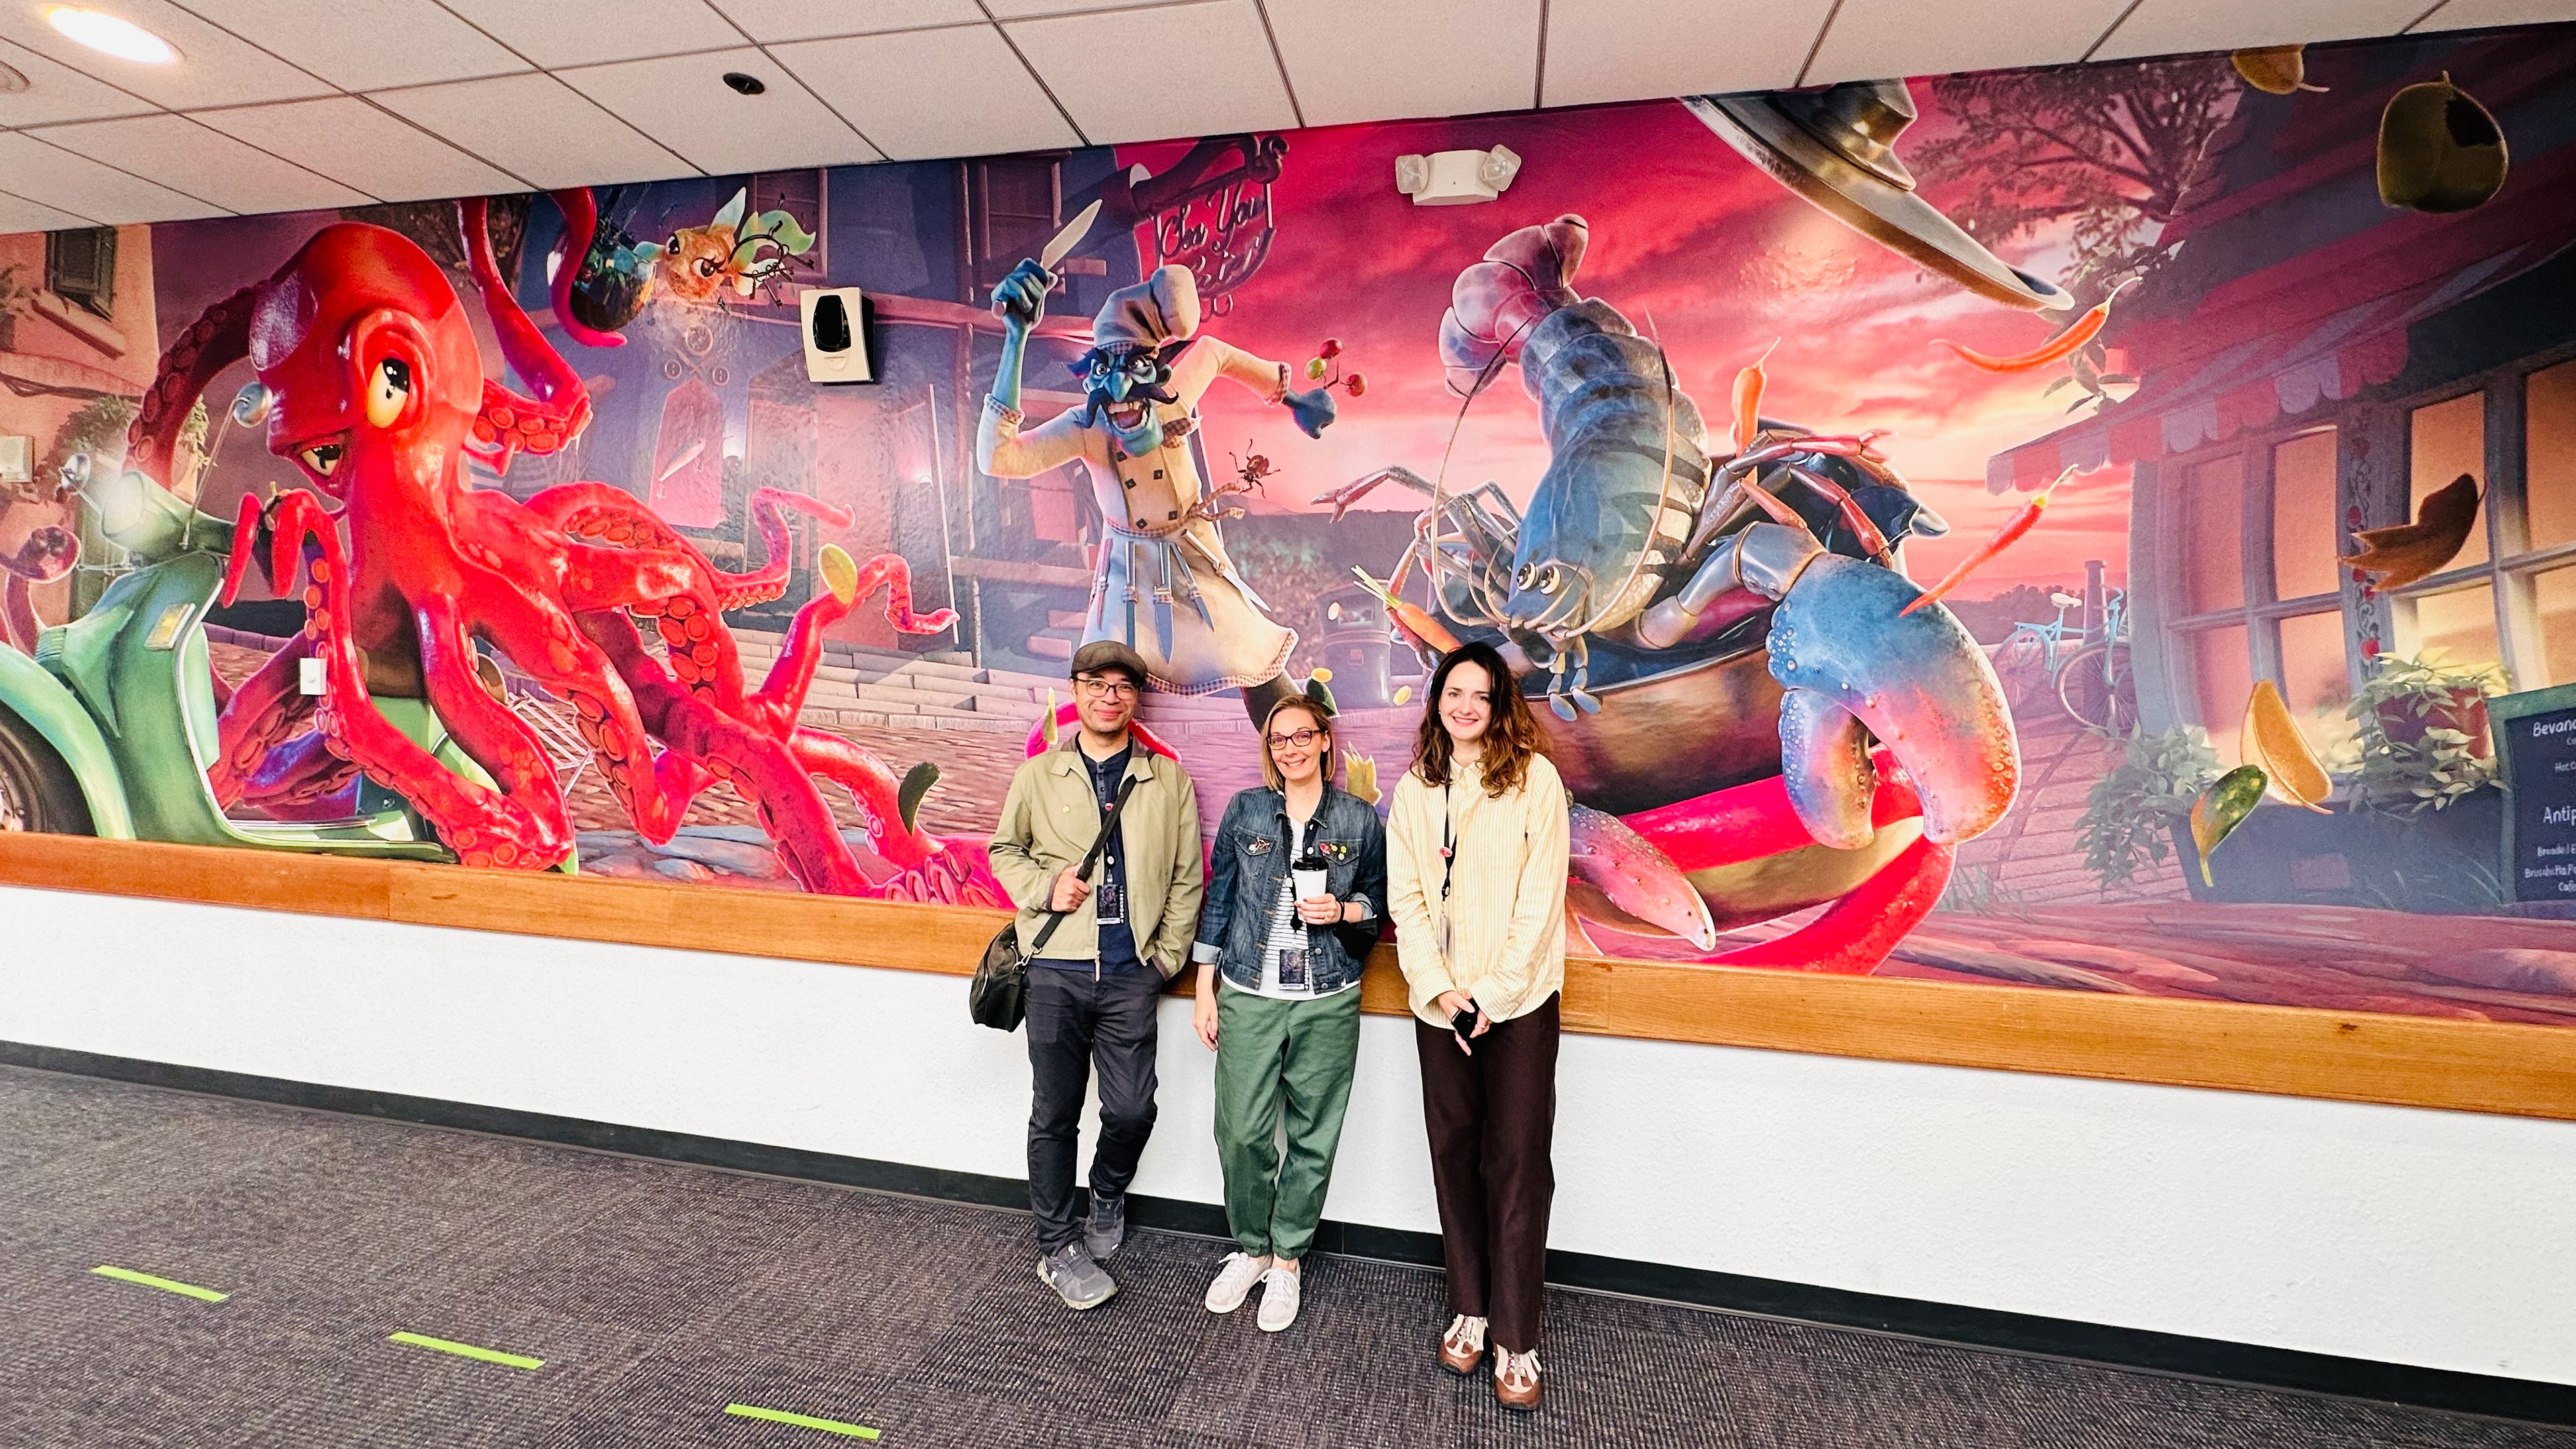
In late 2024 the Adobe Substance 3D team were invited to attend LightBox Expo, one of the leading festivals for the entertainment industry. As part of their participation, the team created Not Dinner, a mural fourteen meters long and two meters high, displayed on one of the convention center’s walls. Project leader Nikie Monteleone discusses the process behind the creation of this massive artwork.
And to mark the release of this in-depth look at the team's process, we're making two of the models from this project free to download on Substance 3D Assets! Read on for more info.
Nikie: The idea that would ultimately become Not Dinner first came to me back in 2020, during the height of the COVID-19 lockdowns. I posted a rough sketch to my Instagram story—a whimsical concept of an octopus on a bike in a back alley. The scene was inspired by my obsession with the textured, winding back roads of Italy. I’ve never been to Venice, but its aesthetic, with its character-filled alleys and rich textures, has always captivated me.
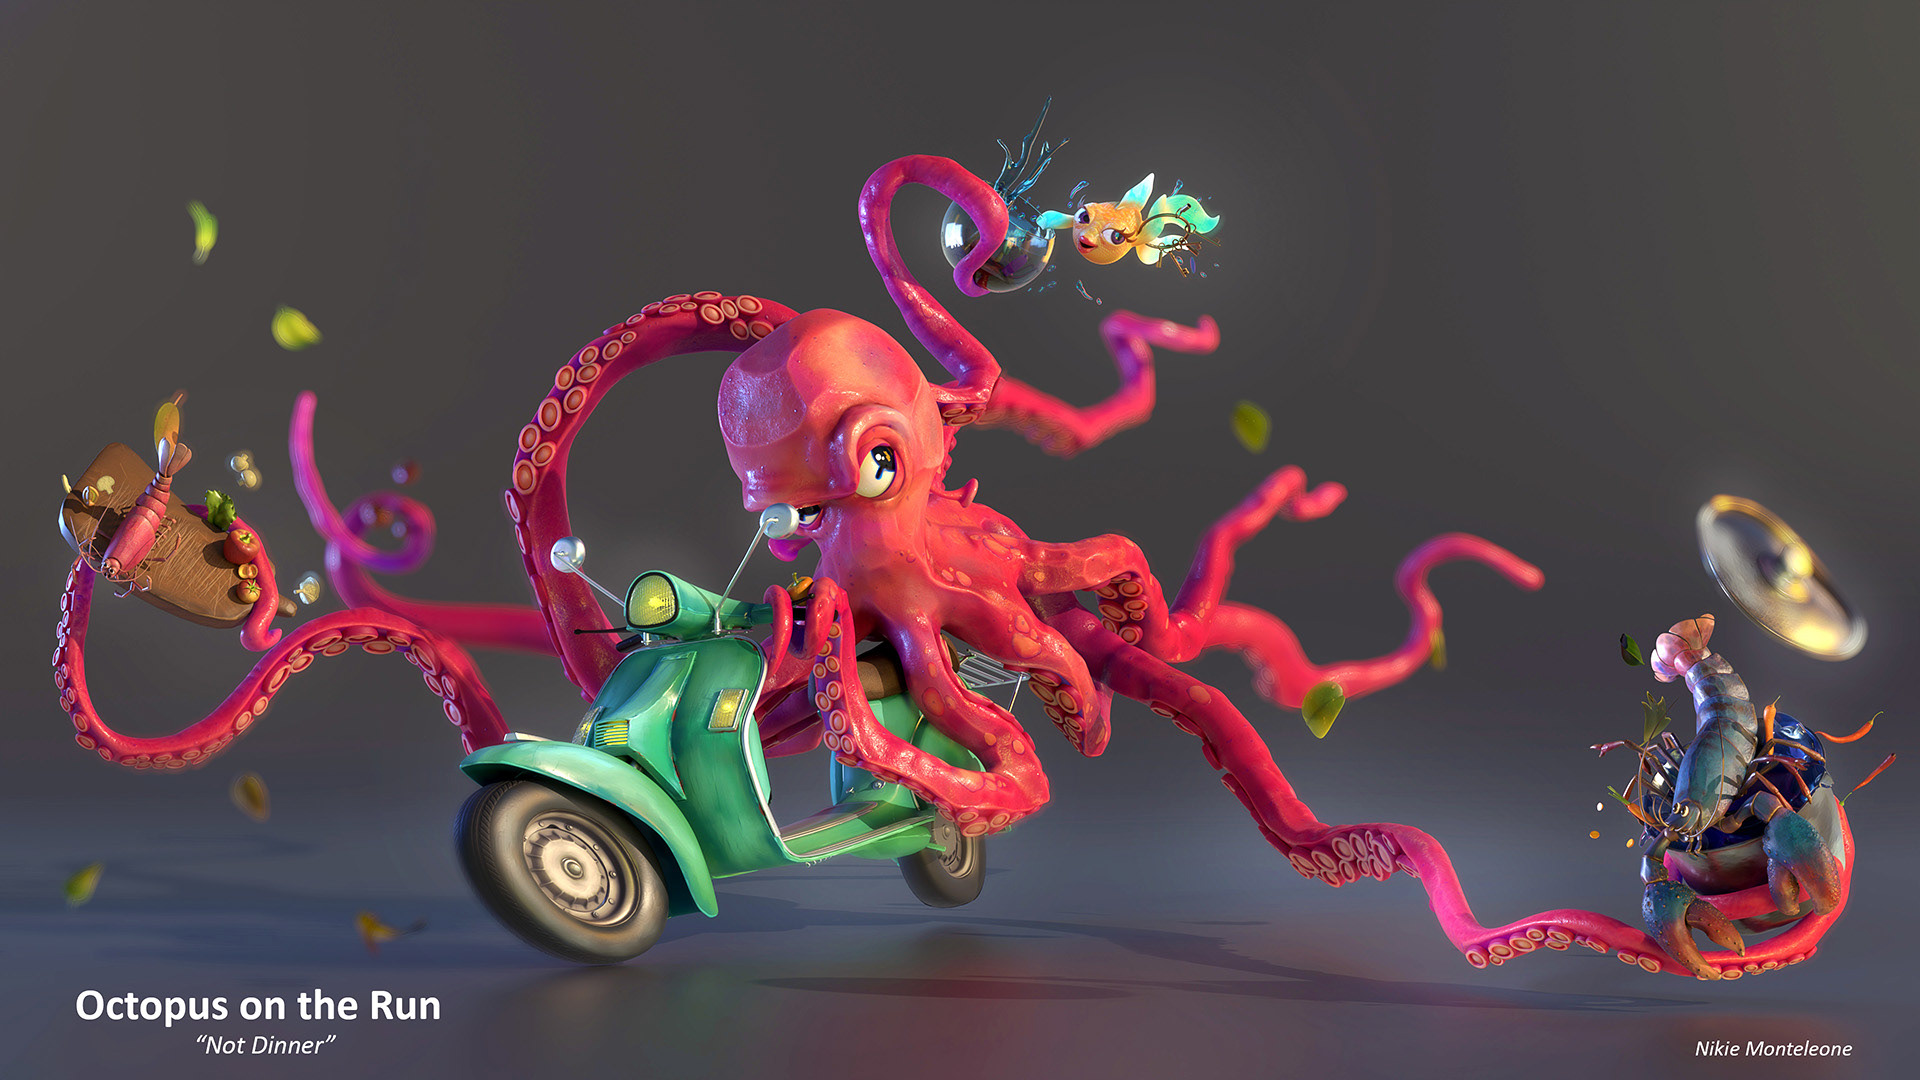
I returned to this idea when we began discussing the creation of the mural for LightBox Expo. The octopus struck me as a perfect centerpiece—not just for its visual appeal but because its eight tentacles allowed for multiple stories to unfold simultaneously. Each tentacle could become a stage for different characters and actions. The concept evolved into a daring narrative: an octopus heroically saving his friends from becoming someone’s dinner.
From Sketch to Team Effort
The early stages were rough sketches I drew in Adobe Fresco on my iPad, just sitting on my couch. These were quick, loose concepts to share with my colleagues. What I didn’t realize at first was just how enormous this mural would be—the longest and most challenging composition I’ve ever tackled.

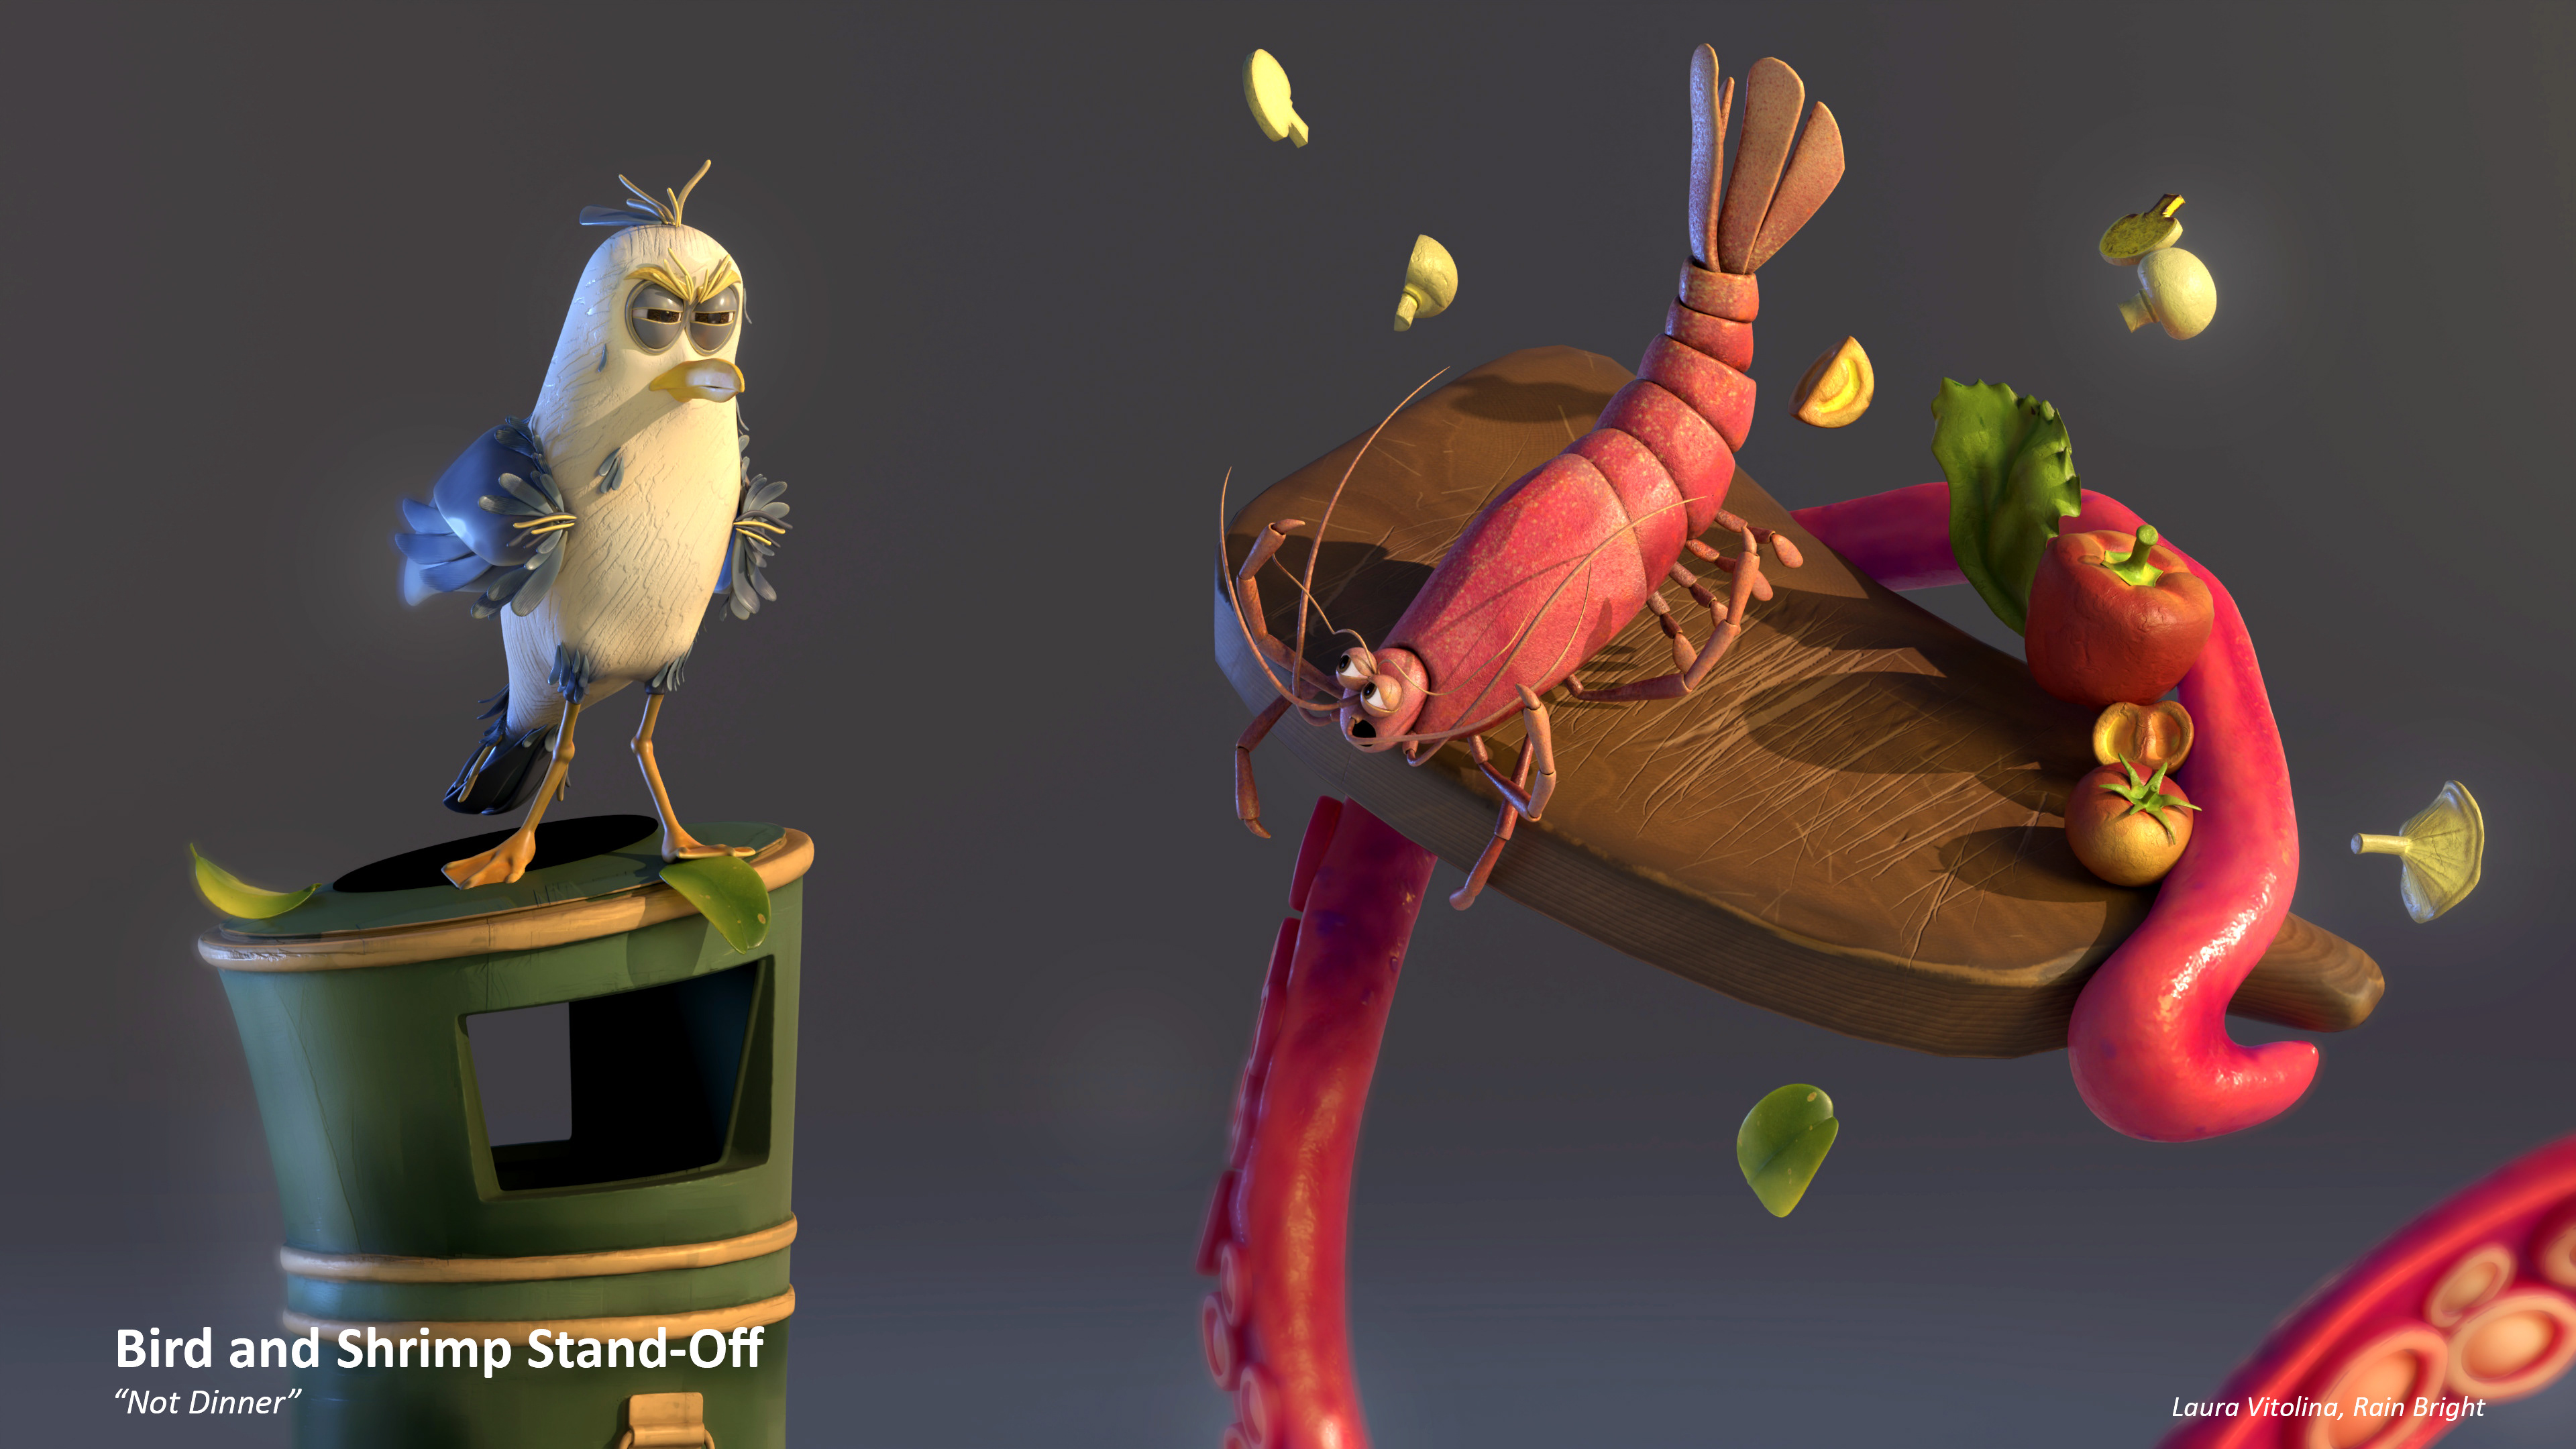
I assembled an incredible team to help bring this vision to life. Laura Vitolina worked on elements like the bird, and the shrimp and the cutting board. Giovanni Nakpil modeled the evil chef and the female character we affectionately called Ms Cherry Tomato. Louise Melin handled a lot of the environmental design, from the painterly details to a lot of the small details and Easter eggs hidden throughout the mural, like the octopus motif on the door. Charles Ellison is well known as a fantastic artist and educator; he created the lobster. Rain Bright contributed the fish design and did some modeling. Rain was a student at the time, and ultimately had to skip the presentation of the mural at LightBox in favor of a graduation ceremony but we were stoked to be able to work with them, this early in their career. And I focused on the octopus, parts of the environment like the moped, and the buildings in the background.
Every artist brought something unique to Not Dinner. It was a joy not only to lead the project but also to watch each individual at work. This piece wasn’t just about showcasing a story or flexing our technical skills—it was also about fostering creativity and community. The result was a gigantic mural that felt alive with detail, collaboration, and heart.

Storytelling Through Detail
The first step in bringing Not Dinner to life was defining the look and feel of the scene. I focused first on the moped; using Substance 3D Painter, I created a video to demonstrate the look and feel I was aiming for—one that leaned heavily into hand painting. Painter is an incredible tool for procedural workflows, but here I wanted to showcase its potential for hand-painted artistry, a less common approach. The moped became a touchstone for the style and storytelling I wanted throughout the piece, and the team really embraced this concept.
We pooled references from trips to Italy, and the rich details of Venetian backstreets became a major source of inspiration: quirky mailboxes, odd trinkets like a plate with a picture of a horse nailed to a wall, and planters affixed haphazardly to buildings.
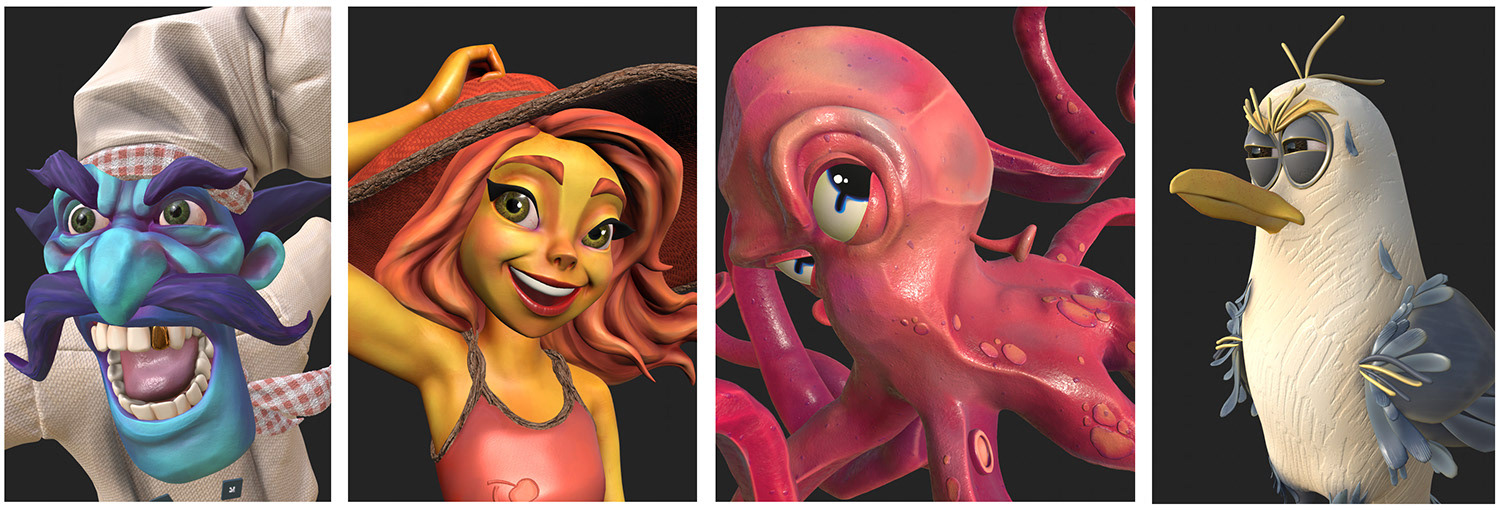
The Evil Chef
Gio took the lead on the Evil Chef character, using Substance 3D Modeler. Initially, we had a basic pose, but Gio refined and exaggerated this, inspired by things like old Warner Bros. cartoons. The stretches and squashes of those animations provided a great reference for the chef’s more extreme, expressive movements. The key here was to keep the pose dynamic, with the character’s silhouette suggesting motion and energy.
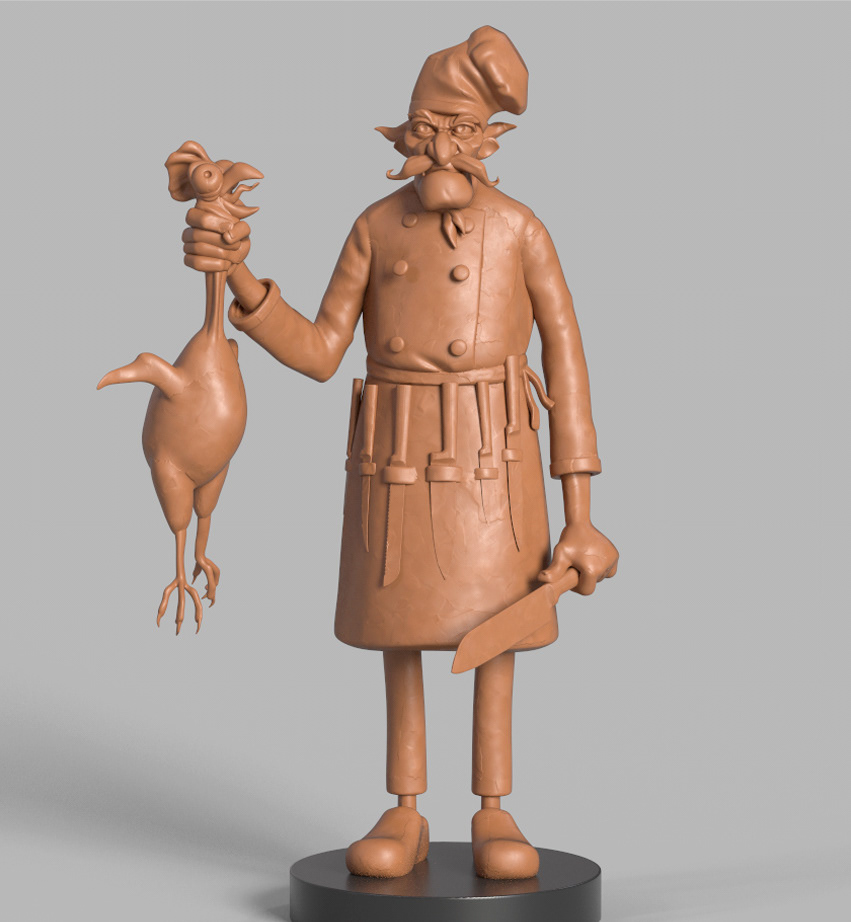
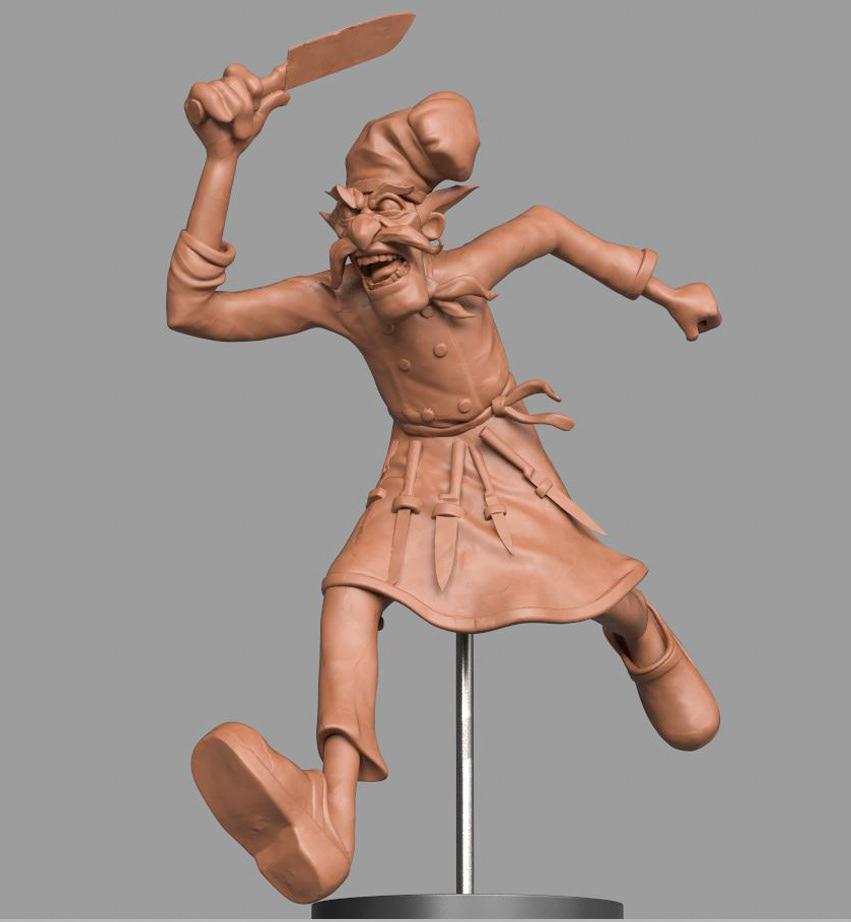
I also contributed to the process by experimenting with poses and modifying the base model in ZBrush. This freedom allowed us to adjust the character’s appearance on the fly, ensuring that it felt cohesive with the rest of the scene.
Miss Cherry Tomato
Miss Cherry Tomato, as we called her, was another standout character. I started by posing her in ZBrush, again using one of the mannequins. Early on, for her head, I simply borrowed a model from Gio, from an older project he’d worked on.

We wanted her personality to shine through; to help with that, I acted as the model—we took photographs of me posing in a bunch of different ways, and picked out what to use as a reference. We intended Miss Cherry Tomato to be a vegetarian, so we wanted to show her happily cheering on the escape, eating a plate of lettuce, tomatoes, and carrots.
As we moved forward with the design, Gio and I worked closely to define her silhouette. We agreed on an approach where one side of her body would be curved while the other side would be flat. This asymmetry added visual interest and made the model feel more energetic.
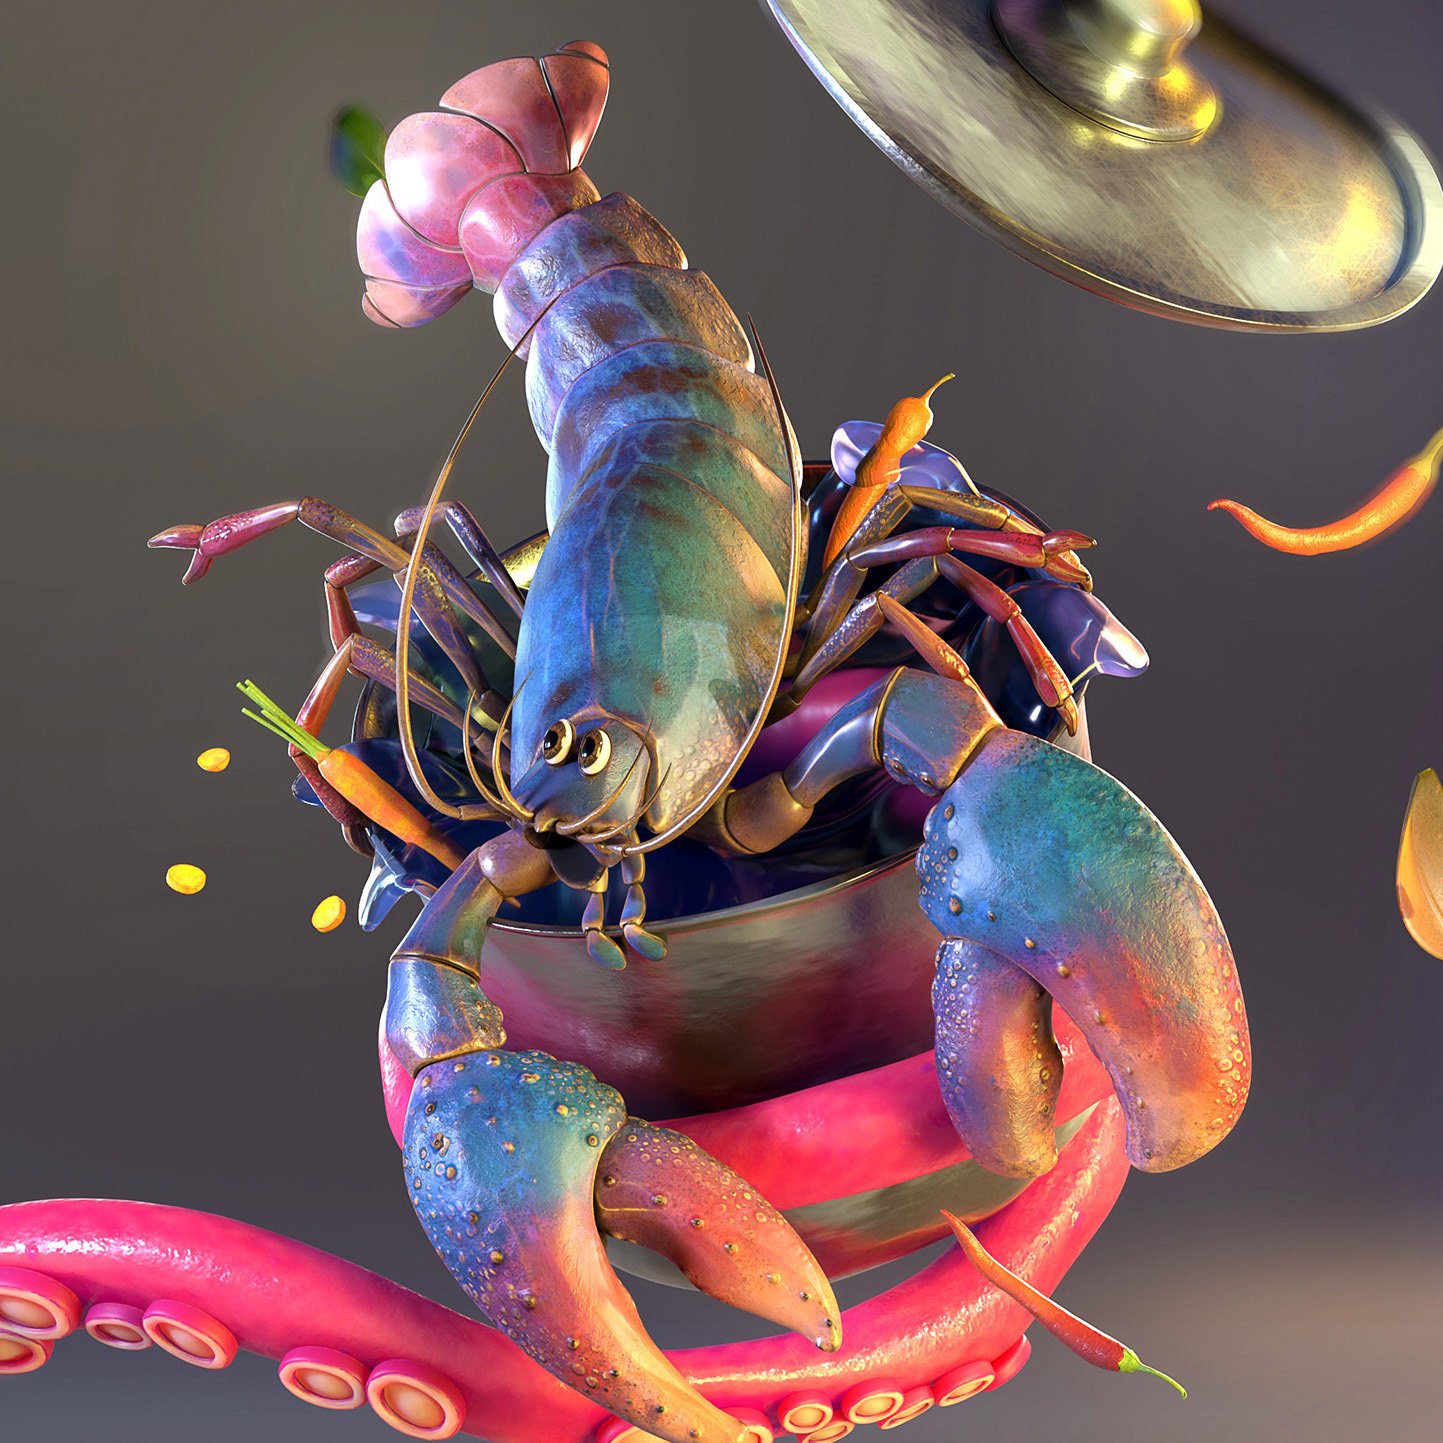
The Lobster
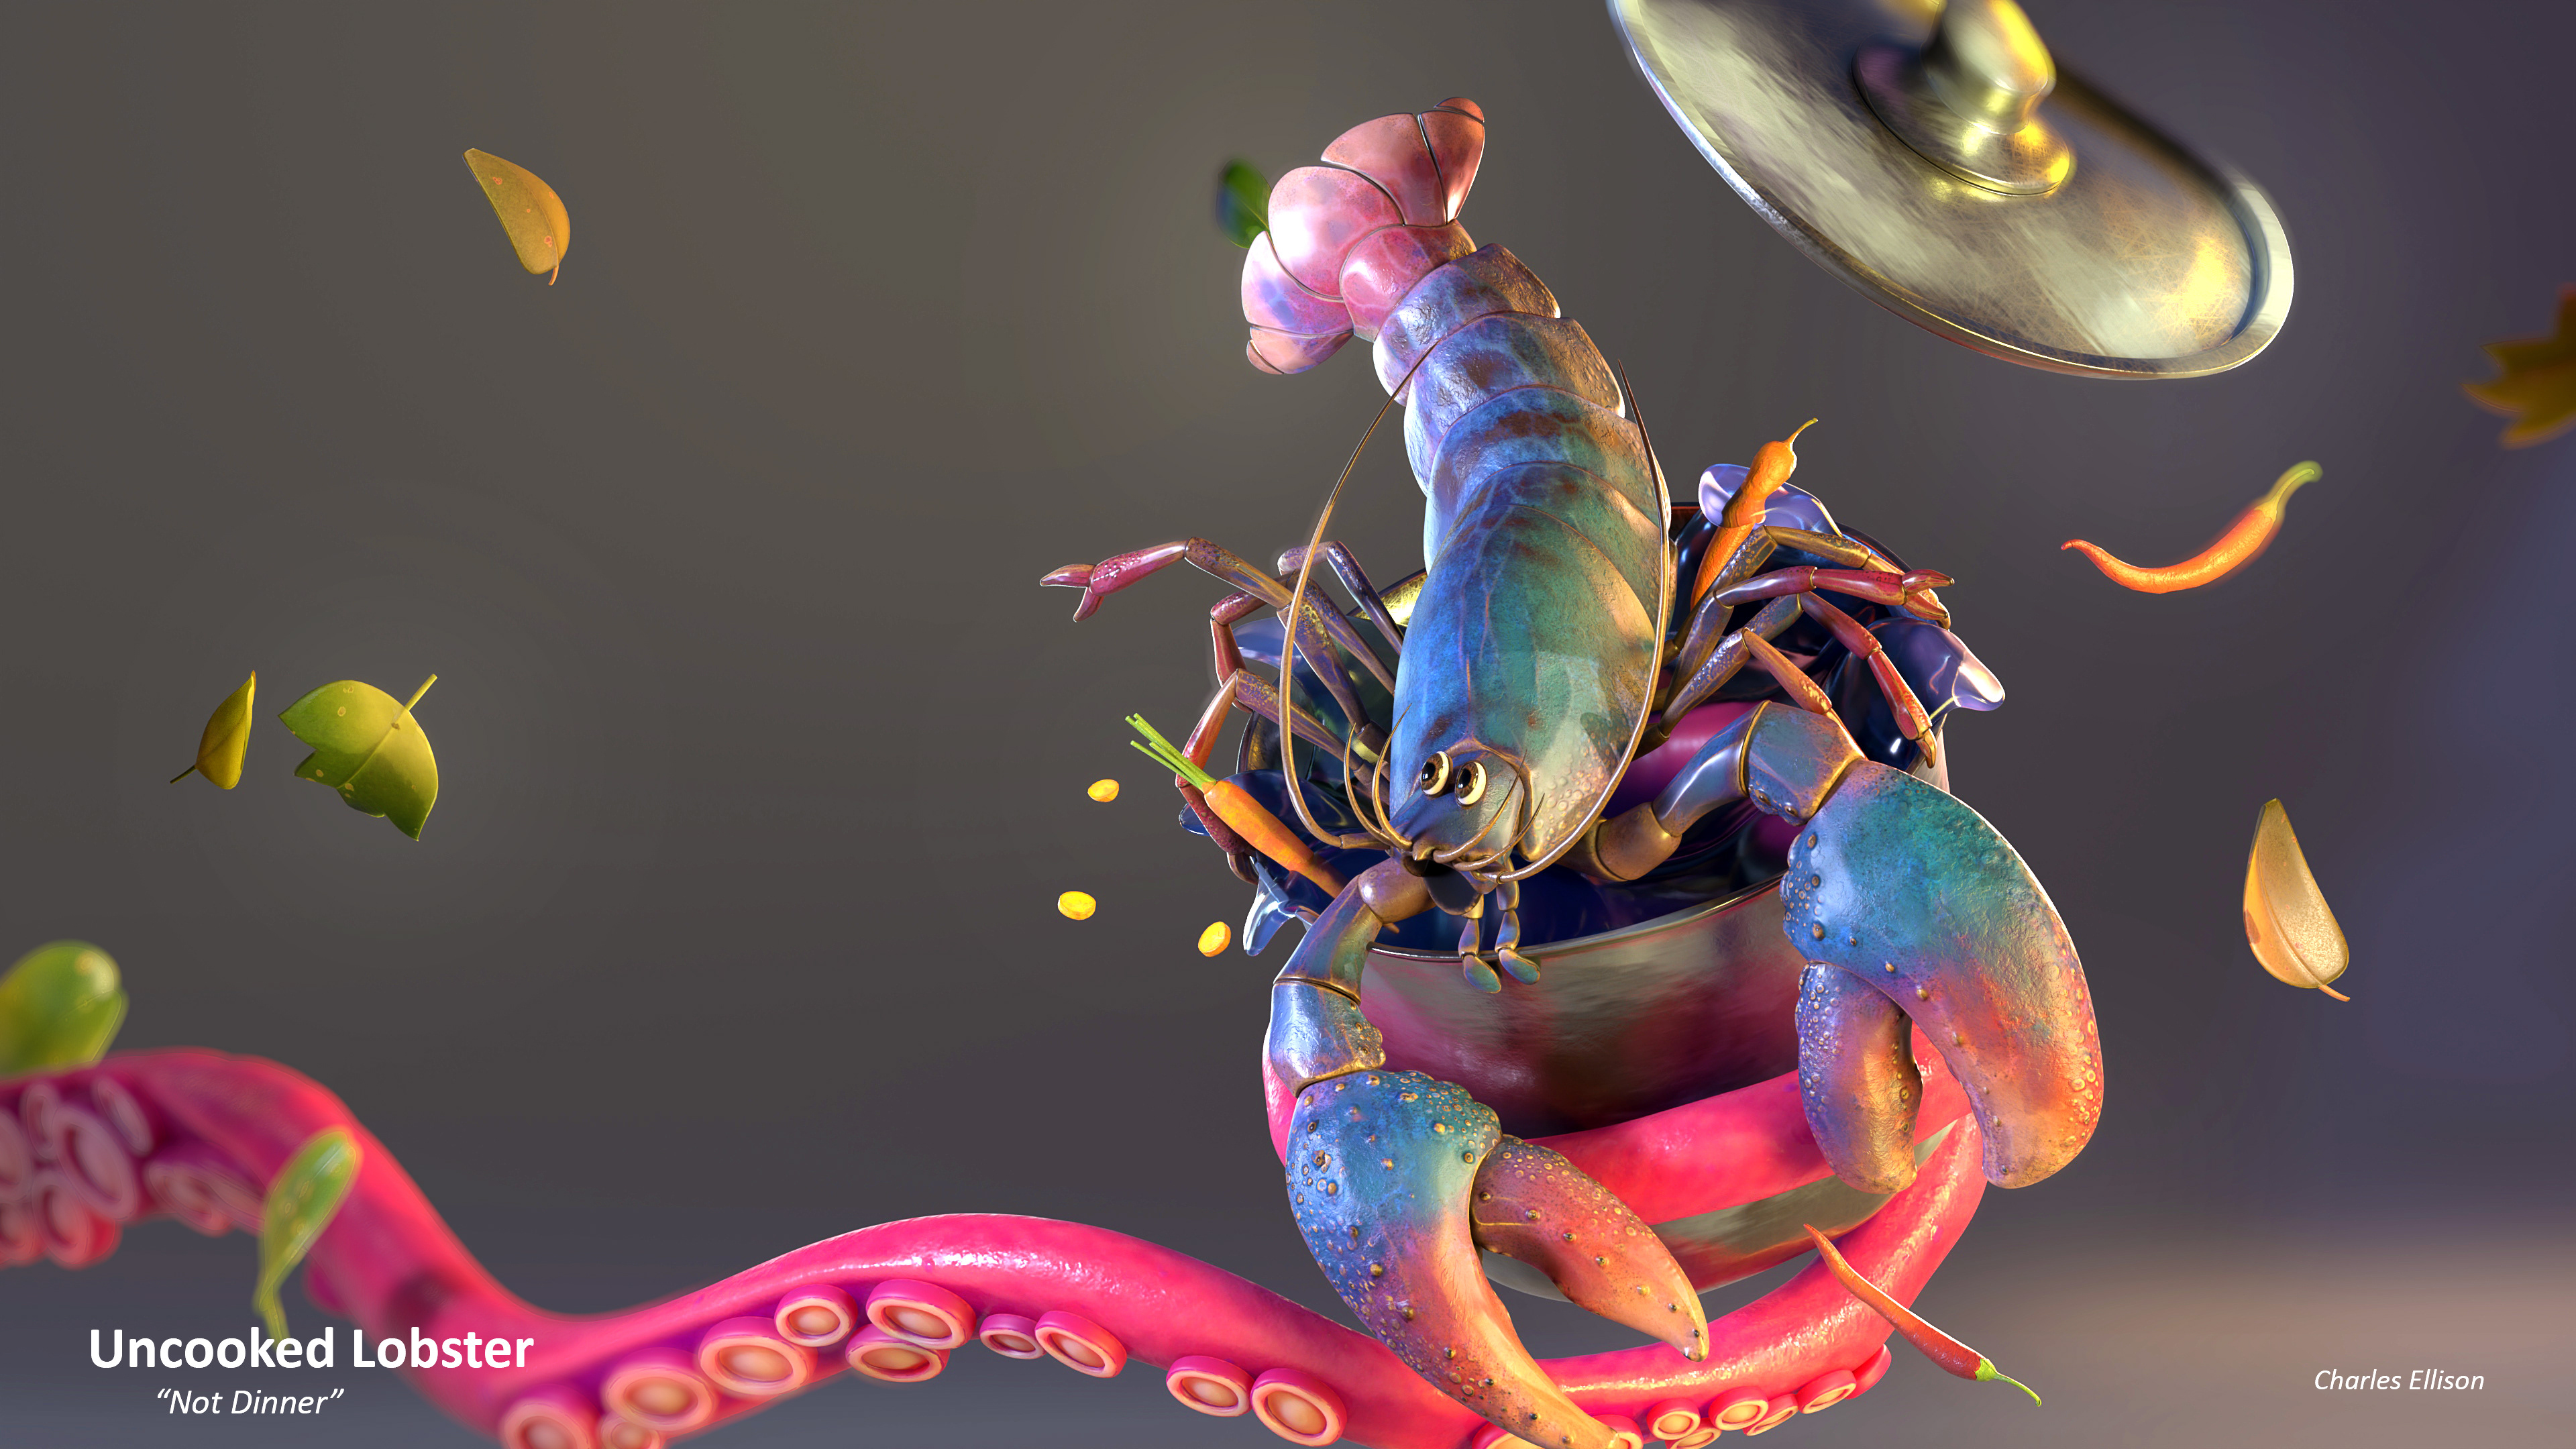
Charles Ellison approached the lobster in a very production-minded way. He began with a simple sphere and then built out the form, ensuring it had clean topology and a mirrored structure, making it rig-ready should we ever want to animate it. His attention to detail in all these regards was exceptional. He also laid out the lobster’s UVs very precisely, making sure that everything would go smoothly when we textured the model in Substance 3D Painter.
The modeling process for the lobster also involved some significant texturing work. In particular, the Edge Polish brush became a key tool. We used it extensively to flatten any areas that were too bulbous, helping to give the model a polished, refined look. This was useful for cleaning up the lobster’s features, ensuring that everything had the right balance of smoothness and detail.
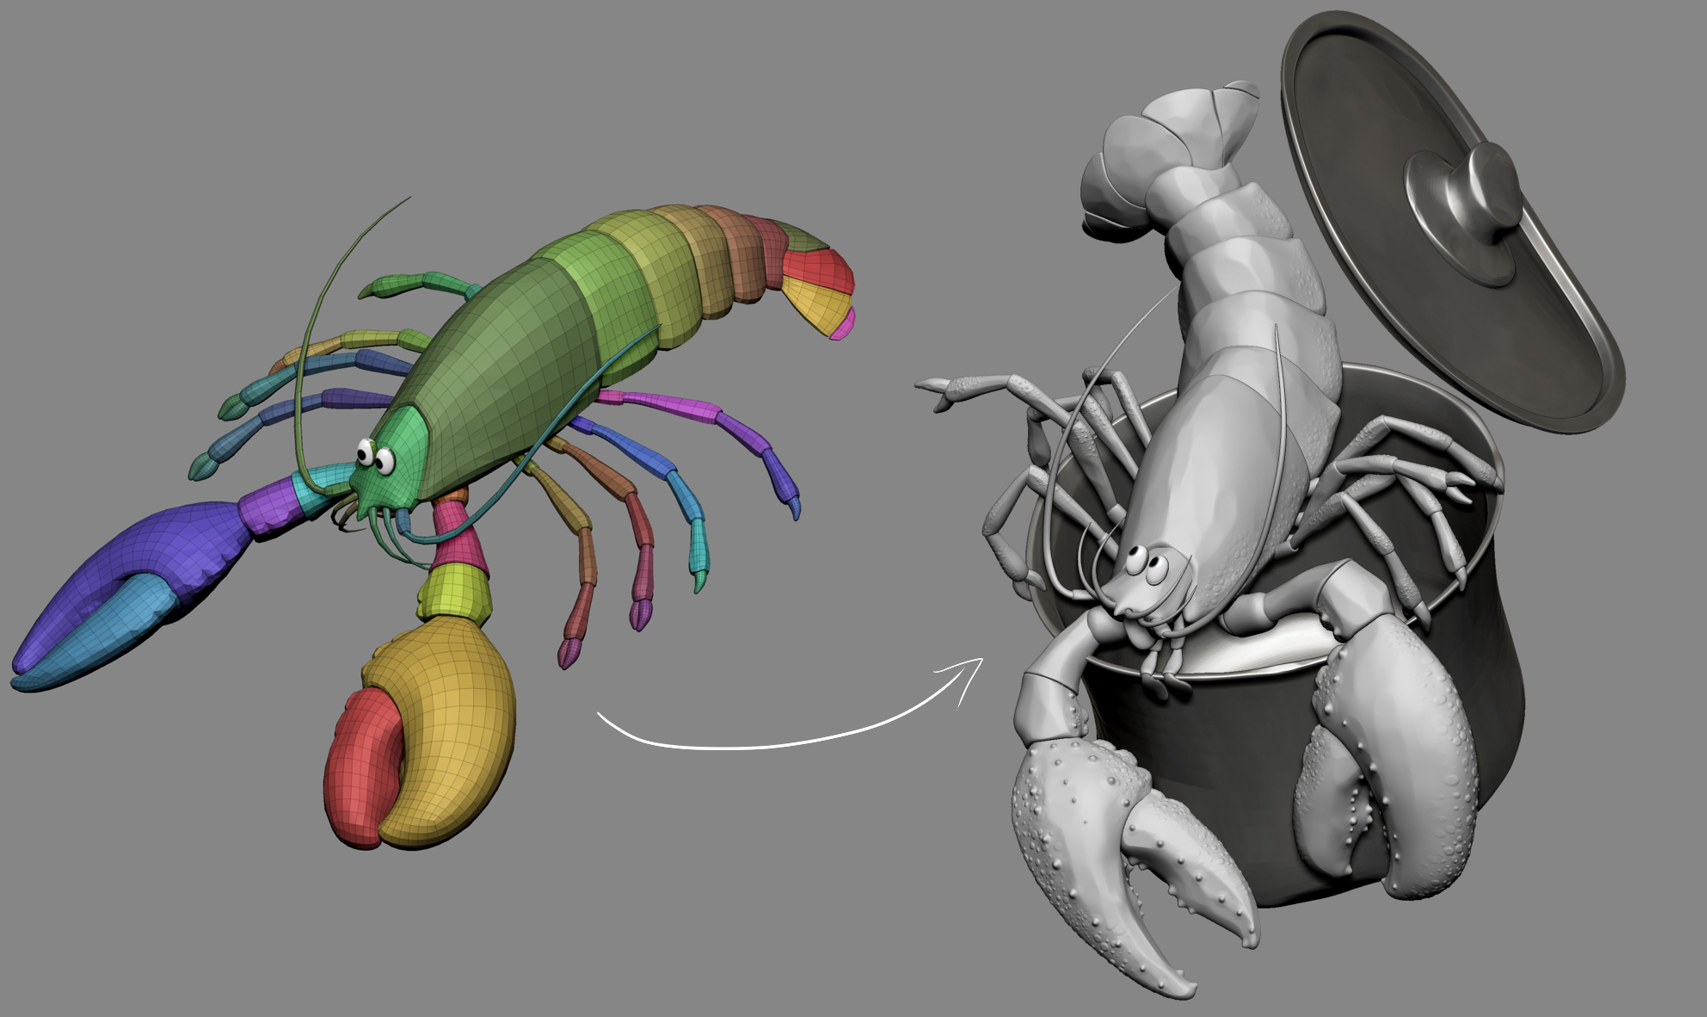
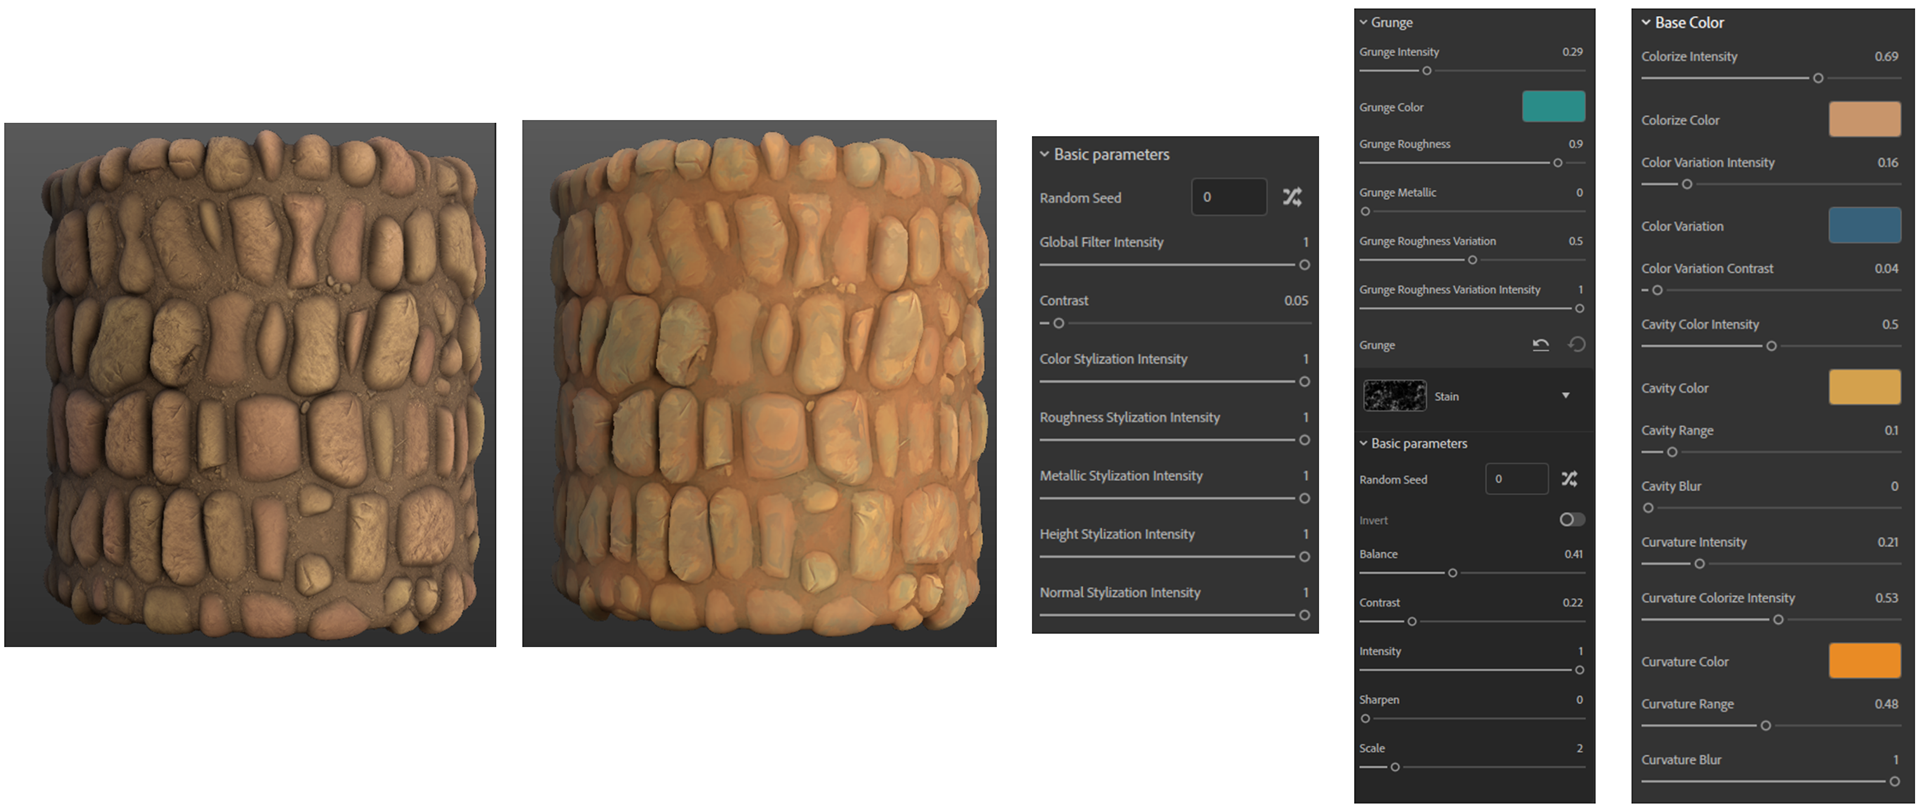
As mentioned above, the lobster model is available for download on Substance 3D Community Assets right now!
Once the model was ready, I sent the scene to Charles, who posed the lobster according to the camera angle I had set up. He returned the posed model to me, and I integrated it back into the scene.
When we revealed the mural at LightBox Expo we had separate computers set up showing our work on each of the characters. The convention attendees at the event were enthralled by Charles’s lobster in particular. It was fascinating for us to see them switch on each layer one at a time and realize how simple the 3D creative process actually was. It was a great reminder that good design often comes from layering small, thoughtful details.
Substance 3D Assets in Not Dinner
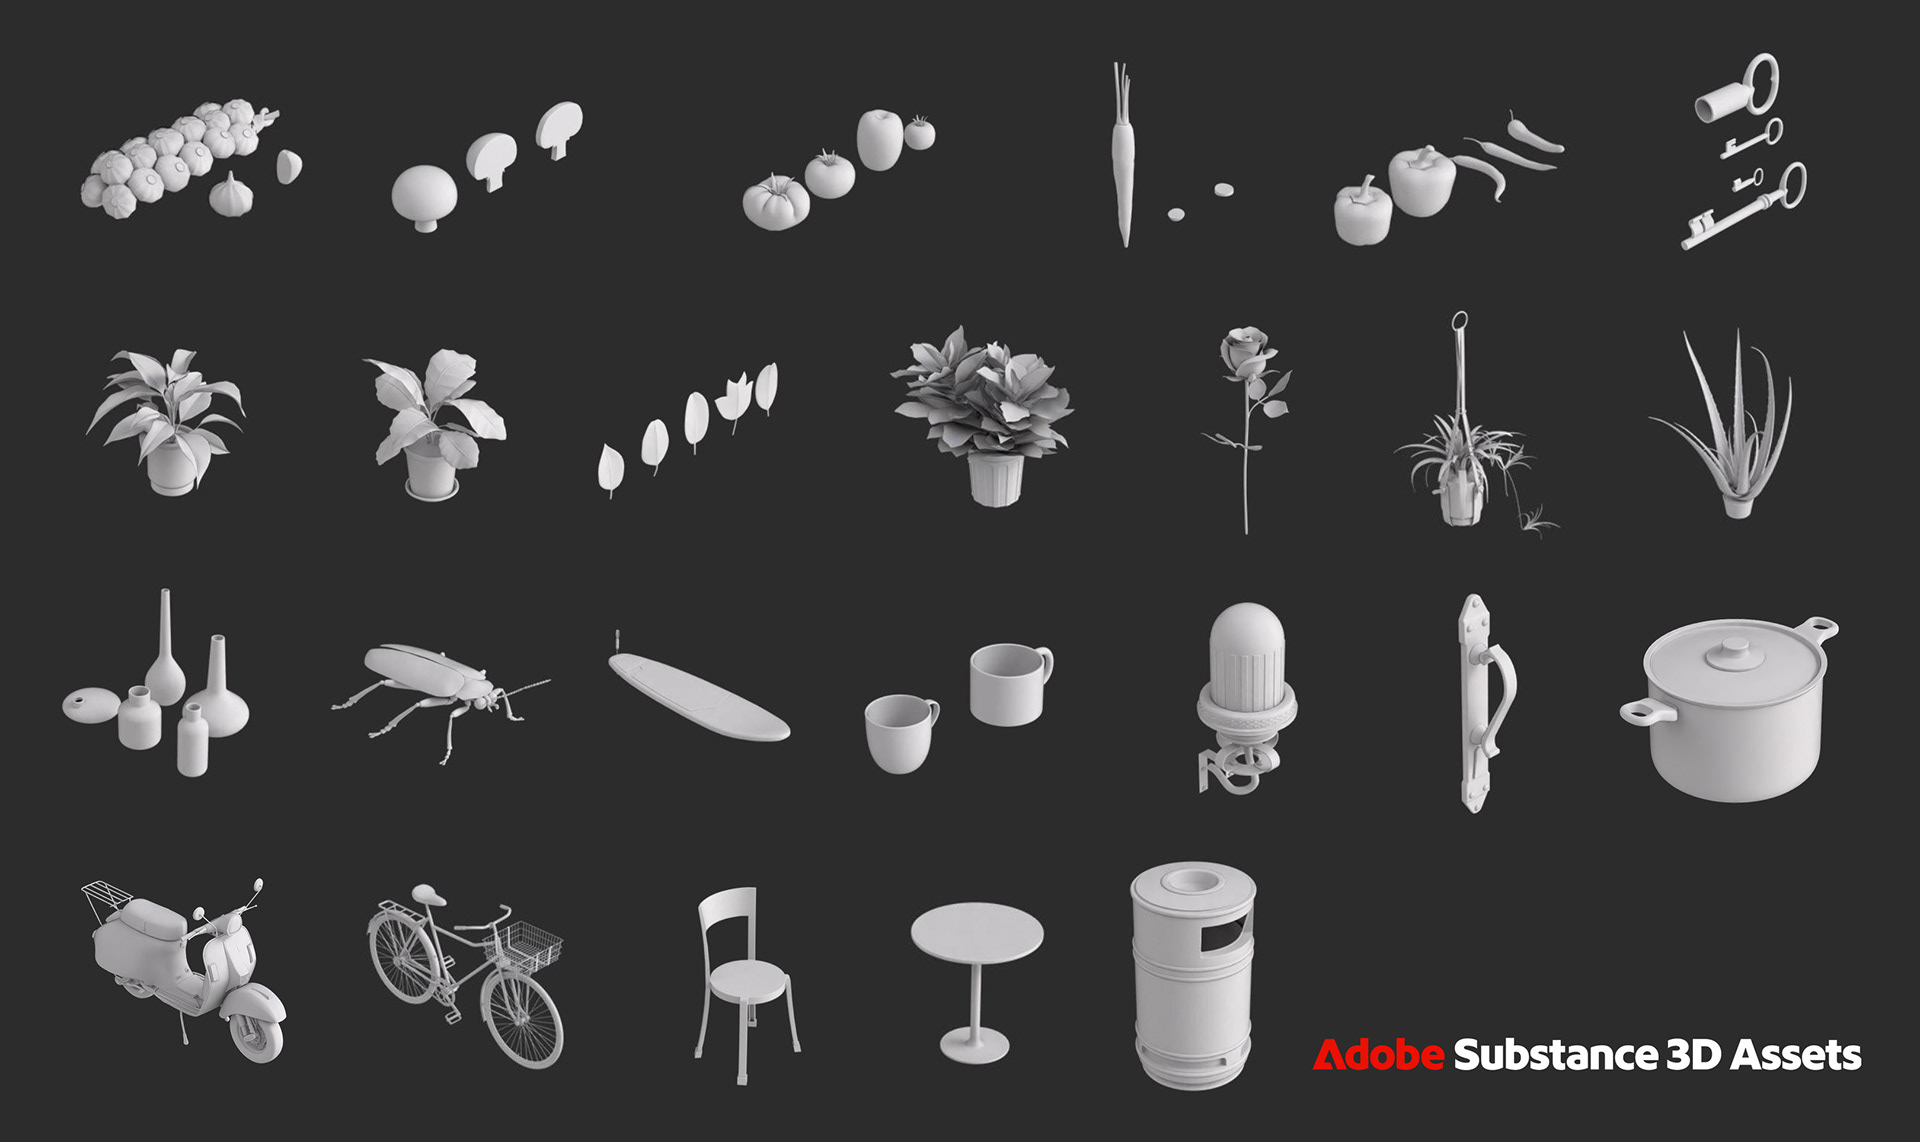
As well as modeling characters and some other elements from scratch, Nikie and the team used a wide range of models and materials from the Substance 3D Assets library. The value that such a resource brings to this kind of project is why we recently launched Substance 3D Assets Unmetered, giving Substance 3D users access to the entire online library of around 20,000 models, materials, and lights.
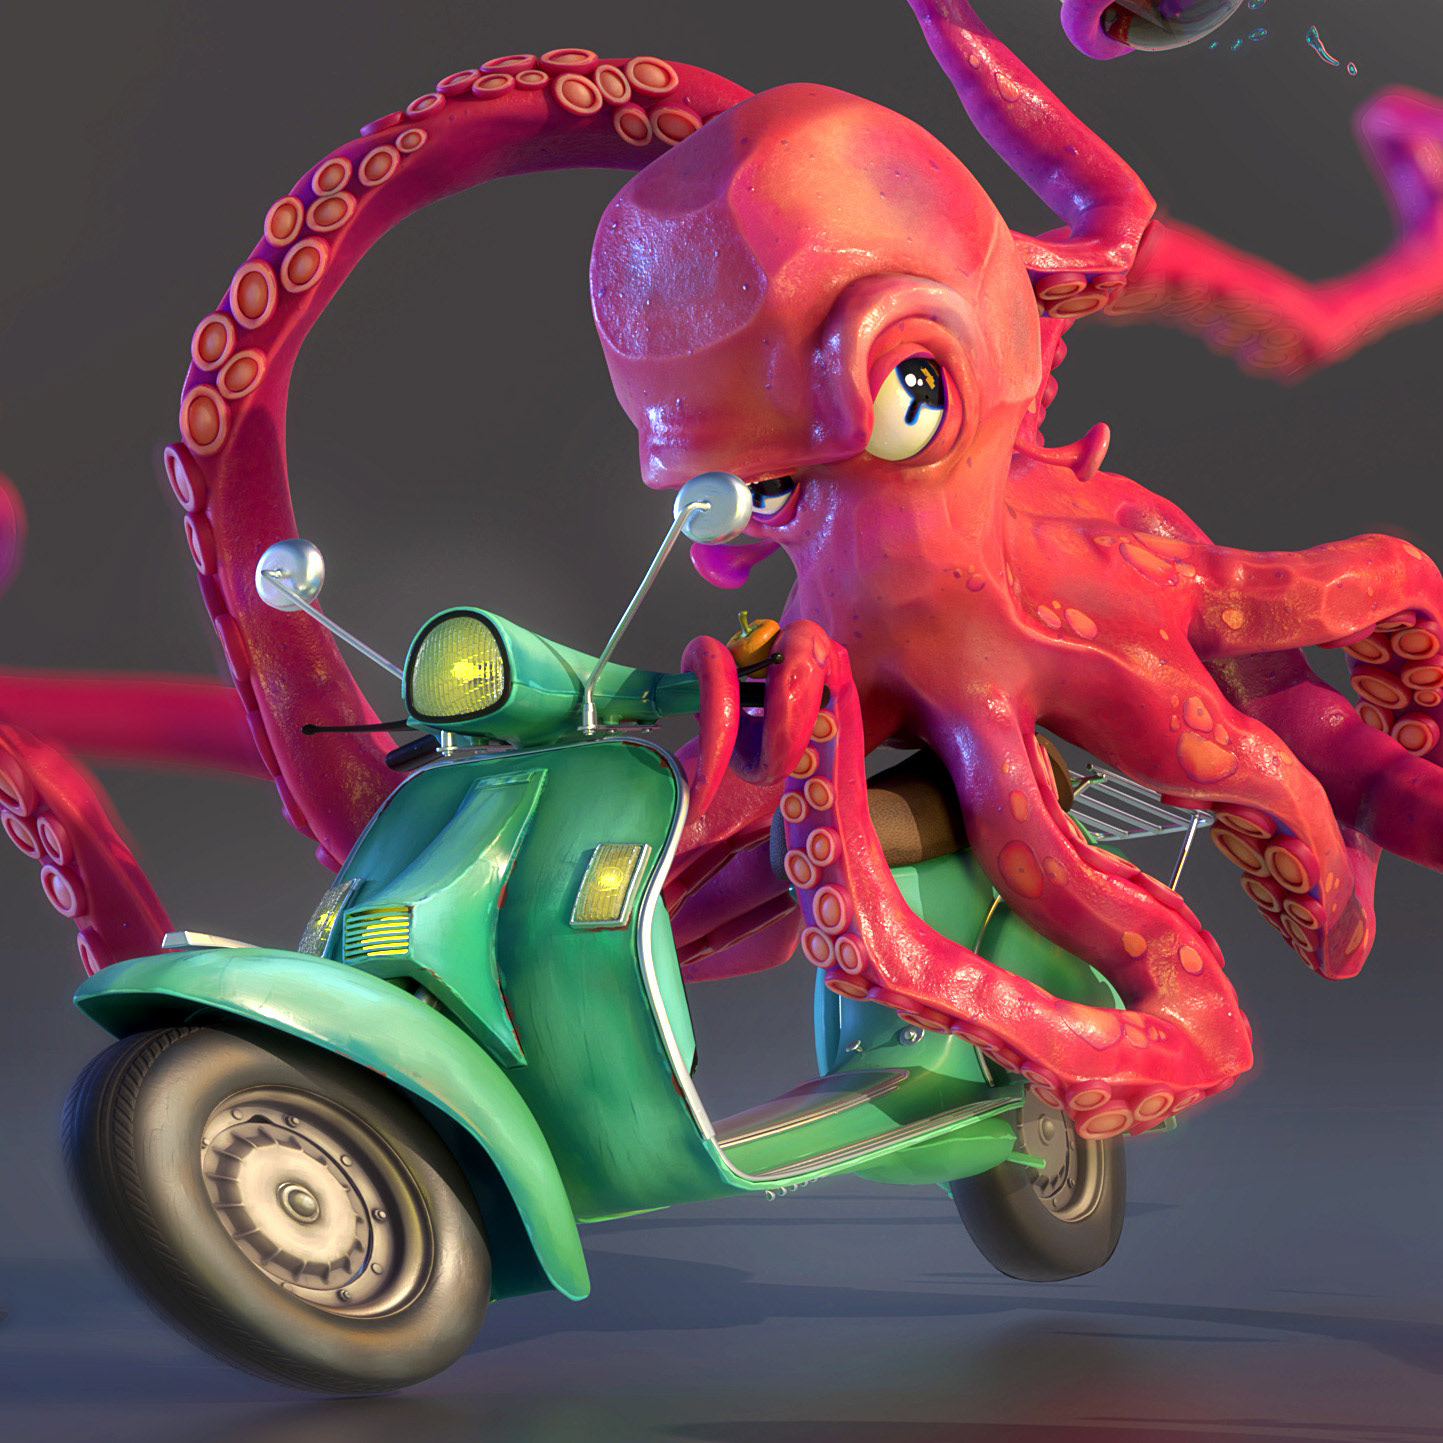
Download the Stylized Lobster and the Scooter from Not Dinner right now, on Substance 3D Community Assets!
Moreover, to mark the occasion of this deep dive into Not Dinner, we’re releasing two of the models from this project on Substance 3D Assets—the scooter on which our heroic cephalopod makes its daring escape, and Charles Ellison’s lobster model. Go to Substance 3D Assets to download the vehicle and the crafty crustacean right now.
Building the Environment
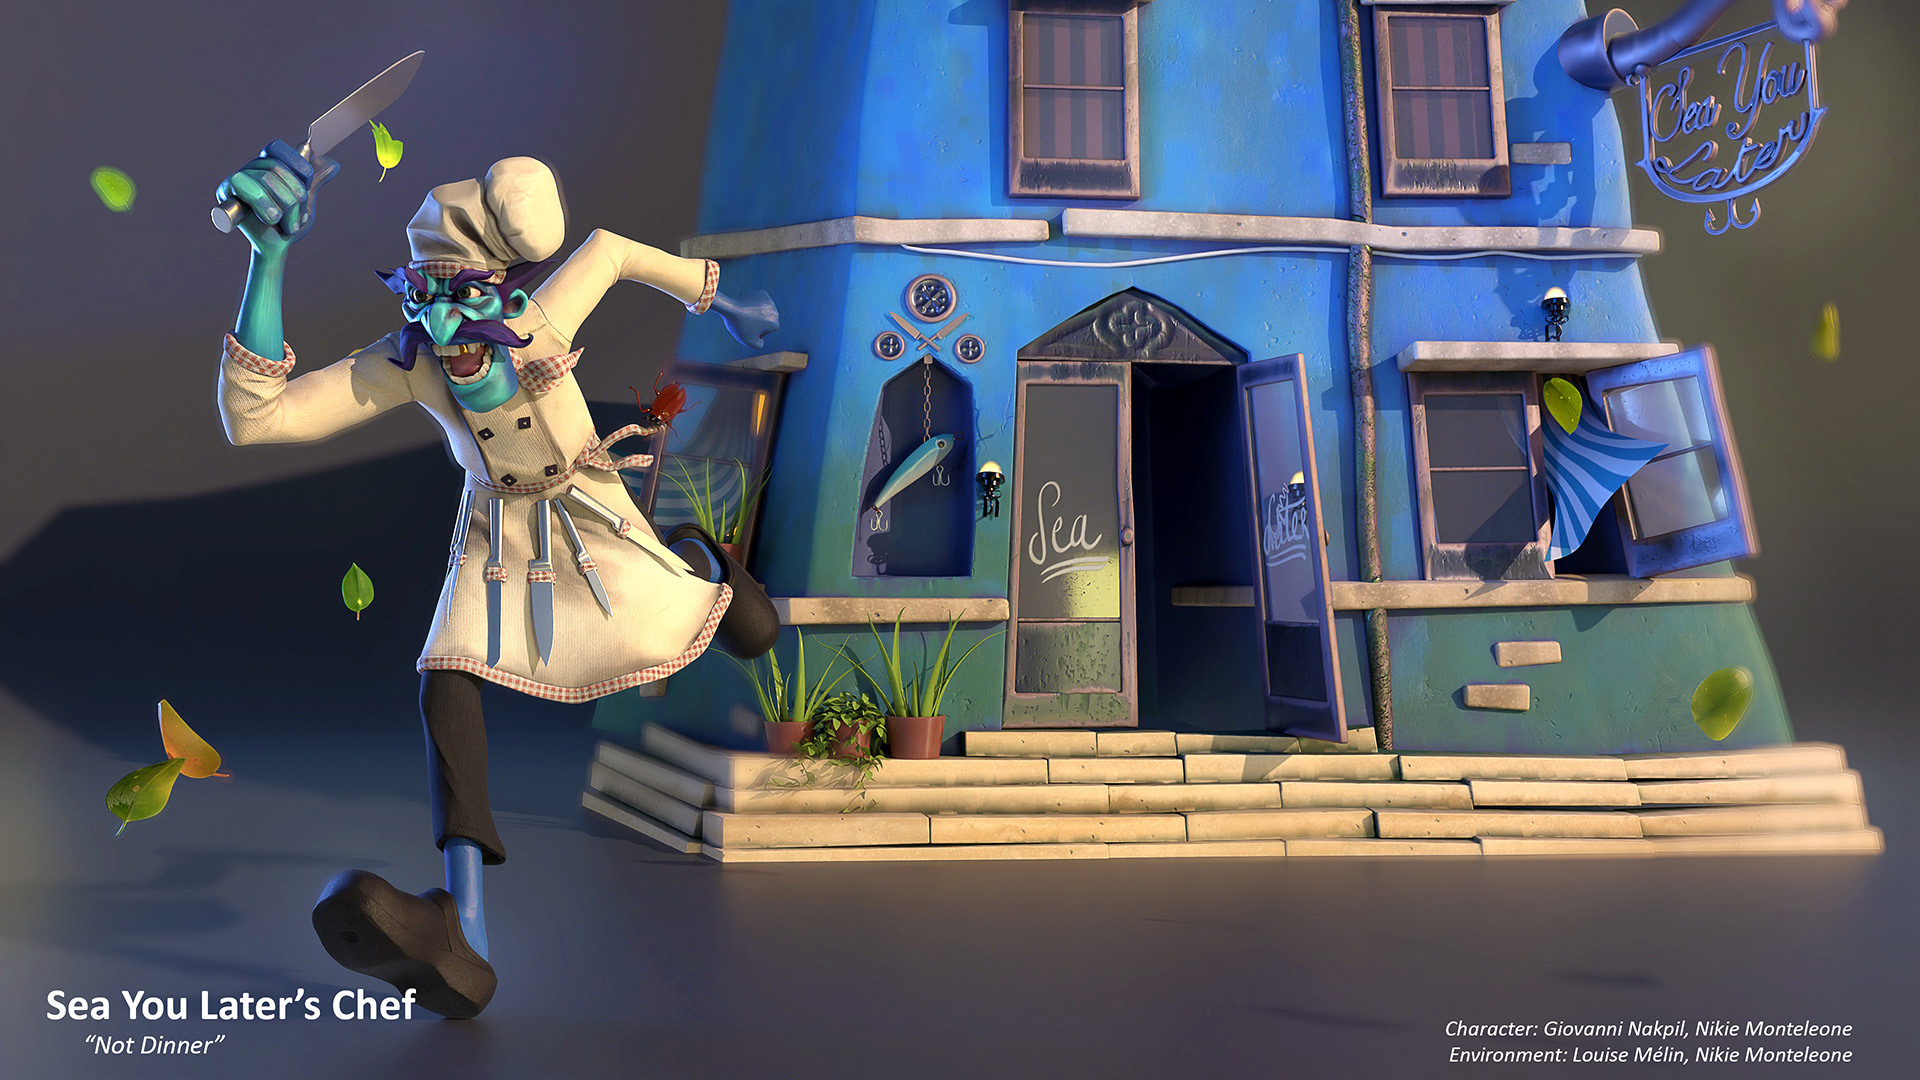
Nikie: Balancing the mural’s scale and complexity was challenging, especially with so many characters and buildings. Each detail, from the octopus tentacle in the "Sea You Later" sign to the scallop shell on a wall, was meticulously considered.
The buildings were an interesting challenge. I started with assets downloaded from the Substance 3D Assets site—basic modern building models. Using Maya, I warped and modified these to fit into our whimsical composition. Louise added a painterly touch with custom brushes for cracks and stylized stone textures. Her dedication was astounding—she hand-painted cracks and surfaces that brought a stunning realism to the scene. She even designed a custom "crack brush" for this purpose. Those tiny details, like cracks in a wall or weathered cobblestones, may seem minor, but they add a richness that pulls you into the world.
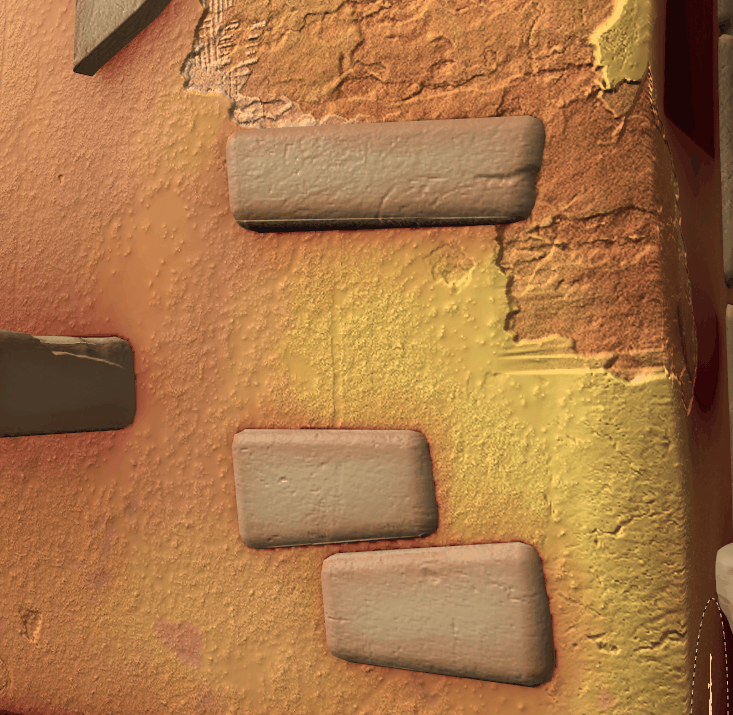
To save time on repetitive tasks without sacrificing artistry, we used tools like the stylization filter in Substance 3D Sampler for some textures, such as cobblestones. Hand-painting the cobblestones might have achieved a slightly more nuanced result, but this would have involved much, much more work. This filter allowed us to work efficiently while maintaining a stylized aesthetic, with the result that we had more time to focus on some of the really key details of the scene.
Color also played an important role in this piece. Laura and I discussed how colors convey emotion in storytelling, both in film and in art. And so, here, the left side of the image is dominated by blues, which are traditionally associated with tranquility, goodness, and safety. On the other side, there are purple hues, which represent something the characters are moving away from—something uncomfortable or ominous.
The yellow building, positioned prominently in the scene, symbolizes something lucky and inviting, contrasting with the darker shades on the other side. These subtle color choices were essential in conveying the mood of the piece, aligning with the emotional journey of the characters.
With the Venetian flavor for the scene in mind, a lot of little storytelling details ultimately found their way into the scene. For example, the "Sea You Later" building in the background wasn’t just a structure—it was a villainous presence with a fishhook-shaped statue designed to resemble a sea creature-killing machine. On the left-hand side, Laura created a moment of tension between the shrimp and the bird, where the bird looms menacingly, and the shrimp’s expression screams panic. Laura even painted a small watercolor piece, which found its way into the scene. These tiny details, like door knockers (sometimes two on the same door, a peculiar Venetian tradition), added charm and character. Even the cockroach clinging to the chef tells a story of its own little bid for freedom.
Texturing with the Substance 3D for Maya integration
The Substance for Maya plugin was incredibly useful in speeding up the application of textures. We textured the models in Substance Painter, and then we could easily transfer those maps into Maya. The plugin helps by automatically setting up the shader network for you. You simply select the render engine (we were using Arnold), and then grab the maps from Painter. It’s a huge time-saver, and it made working in Maya much more manageable.
Assembling the Scene
In many ways, Not Dinner was like working on five or six separate projects that ultimately came together. Each piece had an inner story of its own, and I encouraged the team to bring their individual flair to each of these individual sections, while maintaining the cohesive look of the mural overall. Each team member worked on their own assets and exported their final versions to me. The Maya scene was organized carefully, ensuring each element was saved as a separate version, ready to be linked into the main scene. This careful organization allowed us to work independently without disrupting others' work, ensuring the final scene was seamless. This workflow was far from linear, but it allowed us to adapt and refine the composition as we went along.
The result was a mural rich with narrative, brimming with details, and layered with artistry. Every crack, every trinket, and every nuance tells a story.
I took on the responsibility of rendering the final images, using Maya for the primary renders. I rendered the background and foreground separately to maintain flexibility during the compositing phase, then I used Photoshop to blend these two renders, and made a variety of adjustments, including paintovers, light wrap, color correction and various other techniques to create a unified look. One of the most challenging parts was making sure the lighting and colors across all elements felt cohesive. For example, I toned down the intensity of some of the background colors—especially the bold oranges and blues—to avoid competing with the main characters.
It’s hard to describe just how many layers were involved in this project. The Photoshop file became enormous—about 16GB—packed with detailed work, adjustments, and tweaks. That was a bit crazy, but it was necessary to keep all the layers intact and make adjustments as needed. Despite the file size, Photoshop was a great tool for this kind of detailed work.
Presenting the Mural at LightBox
On 25 October 2024 we unveiled the gigantic mural of Not Dinner at LightBox expo, at the Pasadena Convention Center. Seeing the work of the team displayed like this was a real “wow" moment. There’s something truly surreal about seeing something you’ve created, blown up to such a large scale. It completely alters your perspective and justifies all the attention to detail we painstakingly added!
And, of course, LightBox is a fantastic event that brings together a real mix of next generation creatives and creative professionals. It’s always a huge thrill getting out into the world and meeting members of the 3D community in person. Having this kind of audience see the Not Dinner mural, and getting to witness their reactions to it, was phenomenal. It’s the kind of feedback that drives us on to keep doing bigger and better things (even though creating something bigger than Not Dinner might take some doing).